Installation
Prerequisites
In the following table, steps up to 2 are the minimal requirements for building the C++ model and running it. Everything past that is optional, needed only for the step listed.
| Step | Tool | Purpose |
|---|---|---|
| 2 | Linux, x86_64 | Development platform |
| 2 | g++ (C++11) | Compiling the C++ model |
| 2 | Python 3 | Build scripts |
| 2 | libquadmath |
Quad-precision floating point support. Ships with a standard gcc/g++ install on most Linux distributions, so no separate install step is usually needed. |
| 3 | Sitar CLI | Building and running the cycle-timed Sitar model |
| 4 | gdb | Examining a running model's state directly, see Examining Core State at Runtime Using GDB |
| 5 | sparc-elf cross-toolchain |
Writing and compiling your own test programs. A prebuilt release is bundled, only build your own if it doesn't suit your host, see Cross Compiler. |
| 6 | MkDocs | Editing and rebuilding this documentation |
1. Clone the repository
2. Build and run the plain C++ model
No further dependencies are needed. This model has no Sitar dependency at all.
From the repo root:
This builds an executable, sparc_sim_cpp_core_only_logging, inside
executable/.
Let's try it. The executable expects the name of a test program compiled
to a memory image (a .hex file). A minimal example program,
validation/test_simple_ADD/test_simple_ADD.s, is bundled in the repo
for a quick test of the model, along with its already-assembled memory
image. It adds two numbers and puts the result in a register, then
halts. View it first:
Then run it:
./executable/sparc_sim_cpp_core_only_logging \
    ../../../../validation/test_simple_ADD/test_simple_ADD.hex
The run generates an output:
PROCESSOR STATE: ERROR
PSR.impl 0b0000
...
PC  0x1c
nPC 0x20
...
o0 0xc
...
Simulation halted after 9 cycles.
This prints every register's final value once the program halts. o0 is
0xc (12), the sum of the two numbers the program added. Here, "9
cycles" just means 9 complete instructions executed. This is a plain
functional model with no timing.
When built with the --logging option (the default is without it, for
faster runs), a simulation run also generates a detailed text log of
every event, in test_simple_ADD.log (a trace file is always named
after the hex file it ran, see Logging).
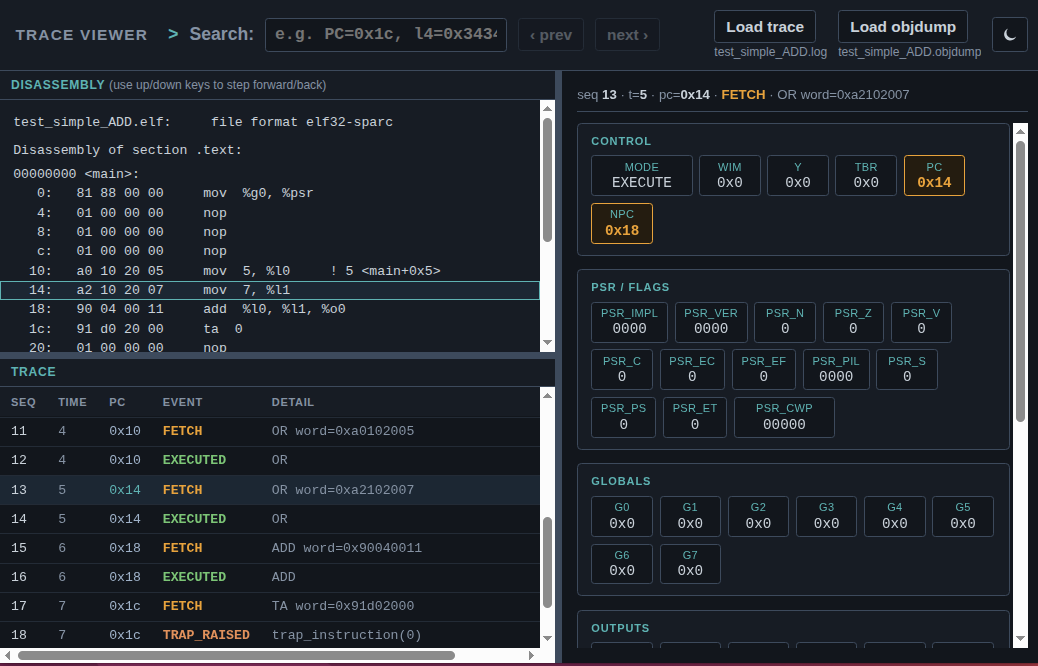
Although the generated log is a plain text file in tab-separated value (tsv) format, and can be viewed in any editor, this project provides a graphical trace visualizer to step through the execution and watch the processor state evolve.
Try the trace viewer here
log viewer, preloaded with the trace for the test_simple_ADD example.
3. (Optional) Install Sitar, and build the timing model
Only needed if you want the cycle-timed Sitar model, not just the plain
C++ one. Follow Sitar's own
installation instructions
first, to build the sitar CLI and put it on your PATH. Check it's
correctly installed, from any location:
From the repo root:
This builds an executable, sparc_sim_sitar_core_only_logging, inside
executable/.
./executable/sparc_sim_sitar_core_only_logging \
    ../../../../validation/test_simple_ADD/test_simple_ADD.hex
The run generates an output, the same shape as step 2 above:
PROCESSOR STATE: ERROR
PSR.impl 0b0000
...
PC  0x1c
nPC 0x20
...
o0 0xc
...
Simulation halted after 8 cycles.
As in step 2, this also writes test_simple_ADD.log (viewable in the
same log viewer), plus a second file,
sitar.log (Sitar's own lower-level per-request/response messages).
4. (Optional) Install gdb
gdb is the standard GNU command-line debugger for compiled programs.
Only needed if you want to examine a running model's state directly with
gdb, instead of (or alongside) logging. This is your host's own gdb,
attaching directly to the model's own process. No cross-debugger is
needed.
See Examining Core State at Runtime Using GDB for how to build with debug symbols and use it.
5. (Optional) Install the SPARC V8 cross-toolchain
Only needed if you want to write and compile your own test programs, rather than just running the bundled example and the existing validation suite. A prebuilt 32-bit x86 (i386) assembler and linker is bundled, which will work for most host setups.
From the repo root:
compiler/install_toolchain.sh          # unzips into compiler/toolchain/
source compiler/toolchain_env.sh       # adds it to PATH, this shell session
Add source /path/to/compiler/toolchain_env.sh to your shell rc file to
make this permanent.
64-bit hosts
The bundled binaries are 32-bit (i386). On a 64-bit host you may need
i386 compatibility libraries. On Debian/Ubuntu, run
sudo dpkg --add-architecture i386 && sudo apt update && sudo apt install libc6-i386 zlib1g:i386.
They won't run natively on non-x86 hosts, such as Apple Silicon Macs.
Use a Linux x86_64 VM instead, or see Cross Compiler
for building your own cross-toolchain with Buildroot.
6. (Optional) Install MkDocs
Only needed if you want to edit and rebuild this documentation. The
rendered site is already committed at docs/generated_site/index.html,
so this step isn't needed just to read the docs.
One-time setup, from the docs/ directory:
pip install also pulls in the two vendored Pygments lexers used for
Sitar and SPARC assembly syntax highlighting.
With the venv active, still from docs/, rebuild the site:
The output goes to generated_site/, commit it along with your .md
changes. Or, to preview edits live in a browser as you make them:
See docs/README.md for more detail.
Next: Getting Started
Once you've built at least the plain C++ model (step 2), continue to Getting Started for a detailed walkthrough.